 Installation
Welcome to the Trivia Quiz App Installation Guide
Thank you for choosing the Trivia Quiz app from CodeCanyon! This guide will walk you through each step of the installation and configuration process to ensure everything goes smoothly. We will start by verifying the required system prerequisites, then, step by step, you will learn how to import the project, configure Firebase, and add functionality to your trivia quiz. Follow each step carefully to ensure the app runs perfectly on your device.
If you have any questions or encounter any issues during installation, feel free to contact our support team at support@rubrikpulsa.com or refer to the available FAQ section. We are here to help you successfully set up your app!
Table of Contents
- System Requirements
- Guide 1: Import the Trivia Quiz App Project
- Guide 2: Refactor Package Name
- Guide 3: Configure Firebase
- Guide 4: Set Up Firebase Authentication and Firestore Rules
- Guide 5: Enable Google Sheets API in Google Cloud Console
- Guide 6: Create Questions with Categories in Spreadsheet
- Guide 7: Creating an API for the Trivia Quiz
- Guide 8: Adding API Key & Base URL
- Guide 9: Integrate AdMob
- Guide 10: Reskin the App
System Requirements
Android Studio Koala: It is recommended to use the latest version to benefit from the newest features and bug fixes. Android Studio is the official IDE for Android app development.
Java Development Kit (JDK): Download version 17 or newer from the official Oracle page. JDK is required for code compilation and running Android applications.
- Internet connection to download required dependencies and APIs
- Google account to access Google Sheets API, Firebase, and Google Cloud Platform (GCP)
- Computer with specifications that meet the supported operating system requirements:
-
 Windows: Minimum Windows 10 or newer, with 8 GB or more RAM and a 64-bit processor.
-
 macOS: Minimum macOS 10.14 (Mojave) or newer, with 8 GB or more RAM and an Intel or Apple Silicon processor.
-
 Linux: Latest Linux distribution (Ubuntu or Fedora recommended), with 64-bit support, at least 8 GB RAM, and compatible graphics drivers.
-
Guide 1: Import the Trivia Quiz App Project
The first step is to download and import the Trivia Quiz App project into Android Studio:
- If you purchased the source code from CodeCanyon, download the ZIP file containing the entire app's source code.
- Extract the ZIP file to your preferred folder on your computer.
- Open Android Studio Koala and select Open an Existing Project.
- Navigate to the folder where you extracted the source code and select the Trivia Quiz App project folder.
- Android Studio will start loading the project. Ensure that the SDK and Android Studio configuration are set up correctly to support Kotlin.
Guide 2: Refactoring Package Name and Project Configuration
This step ensures that your app's package name aligns with the project requirements and the desired app name:
-
Renaming Subfolder Package Name
- In Android Studio, open Project View by selecting the Android option.
- Navigate to the
src/main/kotlin+javadirectory. - Right-click on each subfolder under your package name (e.g.,
com.example.app) and select Refactor > Rename. - Rename each subfolder sequentially to reflect the new package name structure. Example:
com.example.appbecomescom.mycompany.myapp. - Confirm the changes by pressing the Refactor button.
-
Updating
applicationIdin Gradle- Open the
build.gradle (Module: app)file. - Locate the
applicationIdproperty and update its value to match your new package name. Example:android { ... defaultConfig { applicationId "com.mycompany.myapp" // Change according to the new package name ... } } - Save the changes and sync the project with Gradle by clicking the Sync Now button.
- Open the
-
Updating Namespace in Module Configuration
- In the
build.gradle (Module: app)file, check thenamespaceproperty (if present) and update its value to match your new package name. Example:android { namespace "com.mycompany.myapp" // Change according to the new package name } - Save the changes and sync the project with Gradle.
- In the
-
Updating the
packageAttribute in AndroidManifest.xml- Open the
AndroidManifest.xmlfile located in thesrc/main/folder. - Check the
packageattribute in the<manifest>element and update its value to match your new package name. Example:<manifest xmlns:android="http://schemas.android.com/apk/res/android" package="com.mycompany.myapp"> - Save the changes.
- Open the
Once all the above steps are complete, you can proceed to the Firebase Configuration step to integrate your project with Firebase.
Guide 3: Configure Firebase
Follow these steps to integrate Firebase into your Android app up to moving the google-services.json file:
-
Creating a Project in Firebase Console
- Visit Firebase Console.
- Click the Create Project button (or select an existing project).
- Enter the project name, enable Google Analytics if desired, and follow the prompted setup steps.
- Once done, click Create Project and wait for the creation process to complete.
-
Adding an Android App to the Firebase Project
- In the Firebase Console, open the created project.
- Click the Android icon on the Project Overview page to add an Android app.
- Enter your app's
Package Name, which can be found in your Android project'sAndroidManifest.xml. Example:com.example.myapp. - Add your app's name (optional) and SHA-1 (optional but required for features like Firebase Authentication or Dynamic Links).
- Click Register App to proceed.
-
Downloading and Moving the
google-services.jsonFile- After successfully registering your Android app, Firebase will provide the
google-services.jsonfile for download. - Click the Download google-services.json button.
- The file will be downloaded to your computer's default folder (usually
Downloads). - Locate the downloaded file in your folder.
- Open your Android project in Android Studio.
- Follow these steps to move the file into the
app/folder:- In Android Studio, open the Project tab on the left side of the screen.
- Locate the app folder in the project structure.
- Drag the
google-services.jsonfile from your download folder into the app folder in the Project tab. - If a confirmation dialog appears, click OK or Refactor to move the file.
- Ensure the
google-services.jsonfile is located inside theapp/folder. You can verify this in Android Studio.
- After successfully registering your Android app, Firebase will provide the
These steps complete the integration process up to moving the google-services.json file into your Android project. Next, you can proceed to Gradle configuration.
Guide 4: Firebase Authentication and Firestore Rules Setup
To secure user data and enable authentication in your app, follow the steps below:
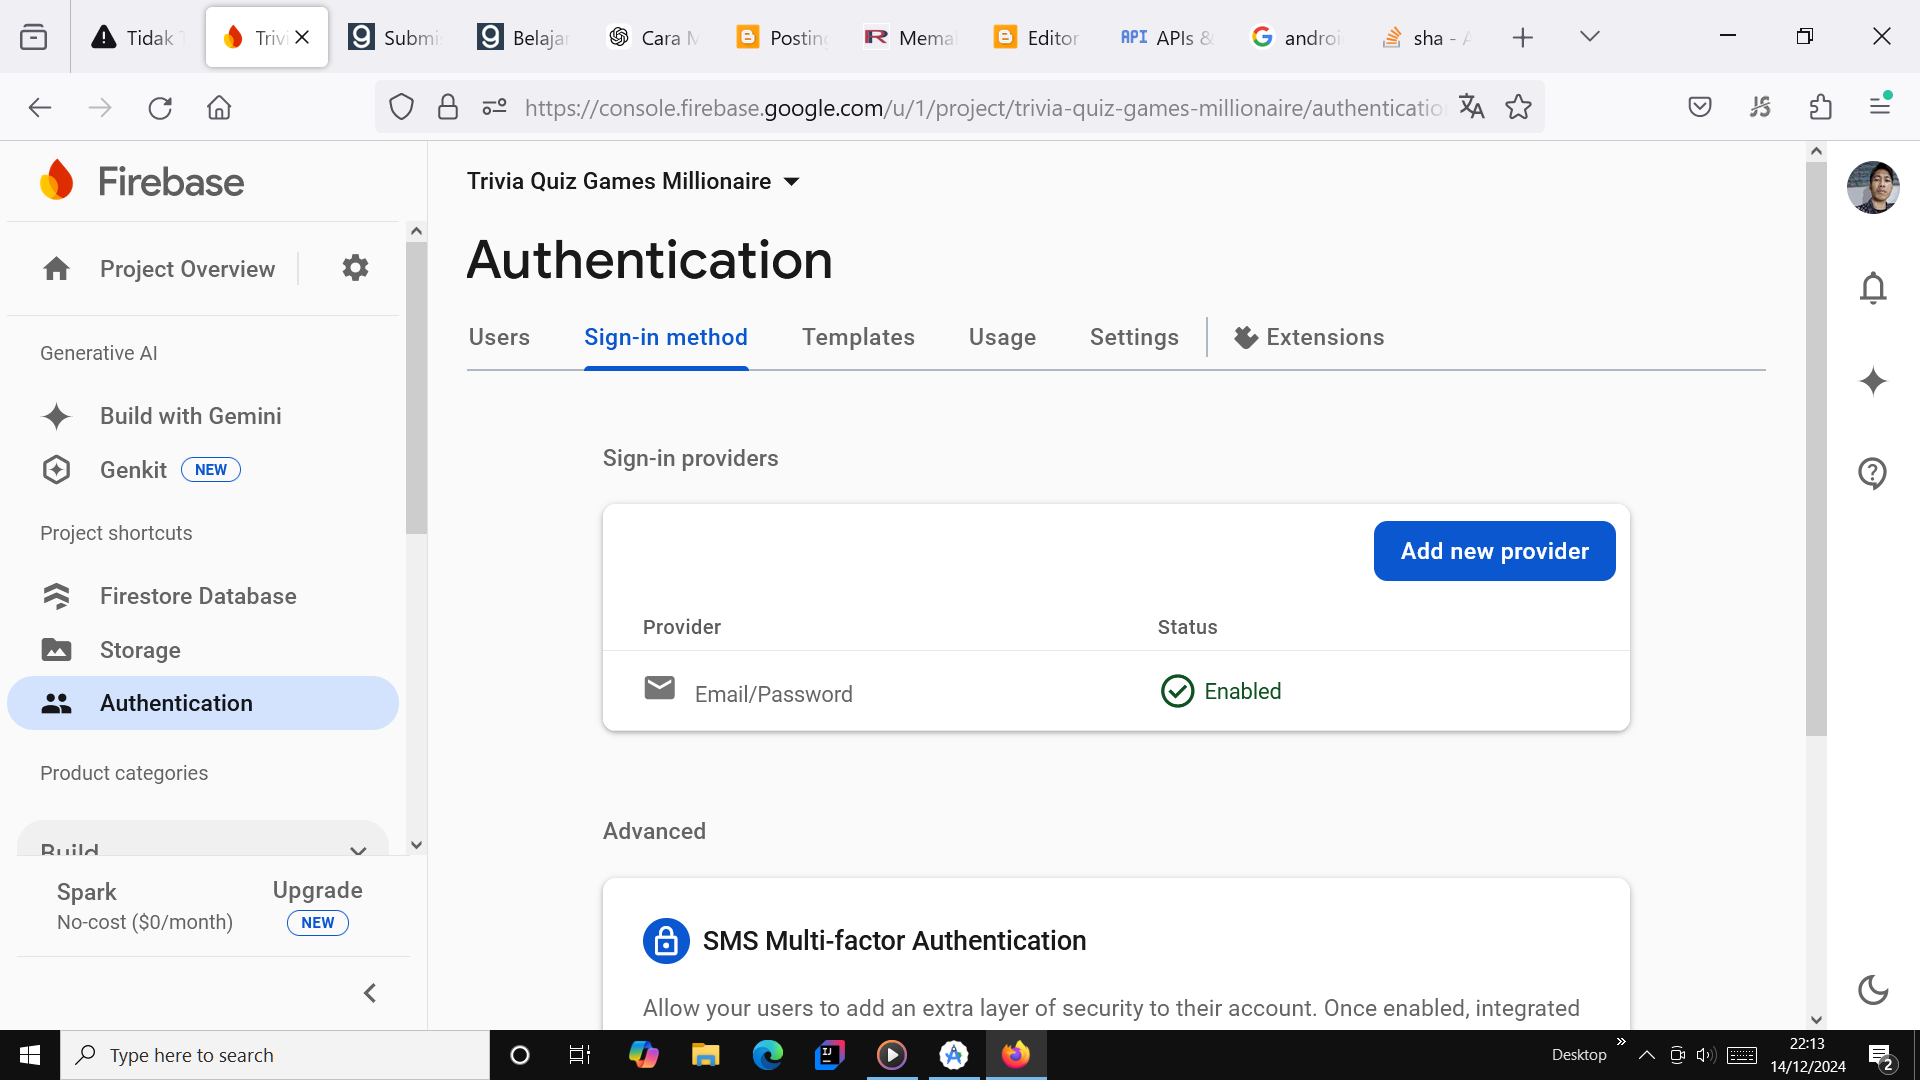
Step 1: Firebase Authentication
- Go to the Authentication tab in the Firebase Console.
- Select an authentication method (email/password, Google Sign-In, phone verification, etc.) and enable it.
- To configure Google Sign-In, follow these steps:
- In the Firebase Console, navigate to Authentication > Sign-in method.
- Enable Google as a sign-in provider.
- Under Web client ID, click Edit and copy the Web Client ID provided.
- Replace the
web_client_idplaceholder in your app'sres/values/strings.xmlwith the copied Web Client ID. For example: - In Android Studio, open the
build.gradlefile and add the Firebase Authentication dependency: - Use
FirebaseAuthto handle the login process in your app, including Google Sign-In and phone verification.
38652167175-tic1rfspnp7hsqdlk2otfba8pc3pm.apps.googleusercontent.com
implementation 'com.google.firebase:firebase-auth:21.3.0'
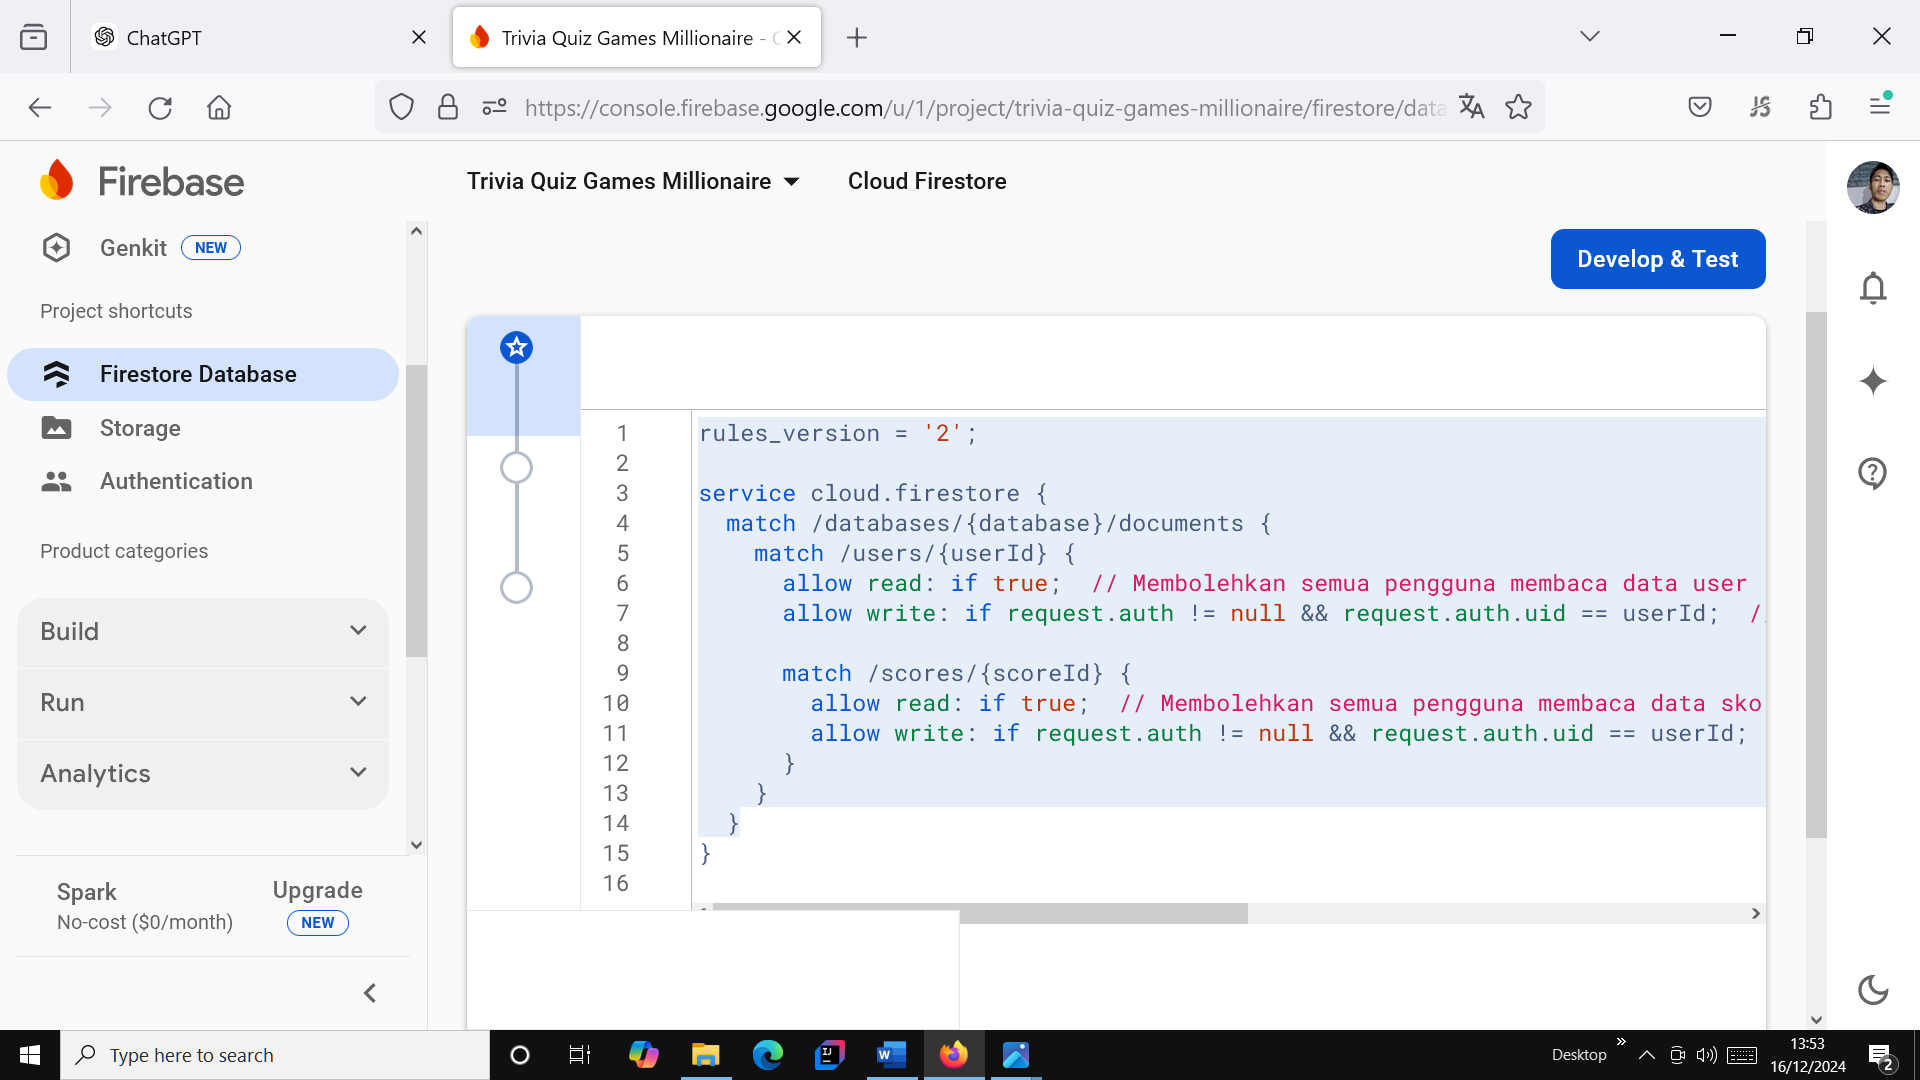
Step 2: Firestore Security Rules
Once user authentication is enabled, add security rules in Firestore to protect user data:
- Go to the Firestore Database tab in the Firebase Console.
- Click the Rules tab.
- Add the following rules in the Firestore editor to ensure that only authenticated users can write their own data:
- Click the Publish button to save and apply the rules.
- Test the rules by attempting to access data using both authenticated and unauthenticated accounts:
- Authenticated users should be able to write their own data.
- All users can read data.
 Cloud Firestore
service cloud.firestore {
  match /databases/{database}/documents {
    match /users/{userId} {
      allow read: if true;  // Allows all users to read user data
      allow write: if request.auth != null && request.auth.uid == userId;  // Restrict write access to the same user only

      match /scores/{scoreId} {
        allow read: if true;  // Allows all users to read score data
        allow write: if request.auth != null && request.auth.uid == userId;  // Restrict write access to the same user only
      }
    }
  }
}
With these steps, your app will be more secure, and user data will be well protected.
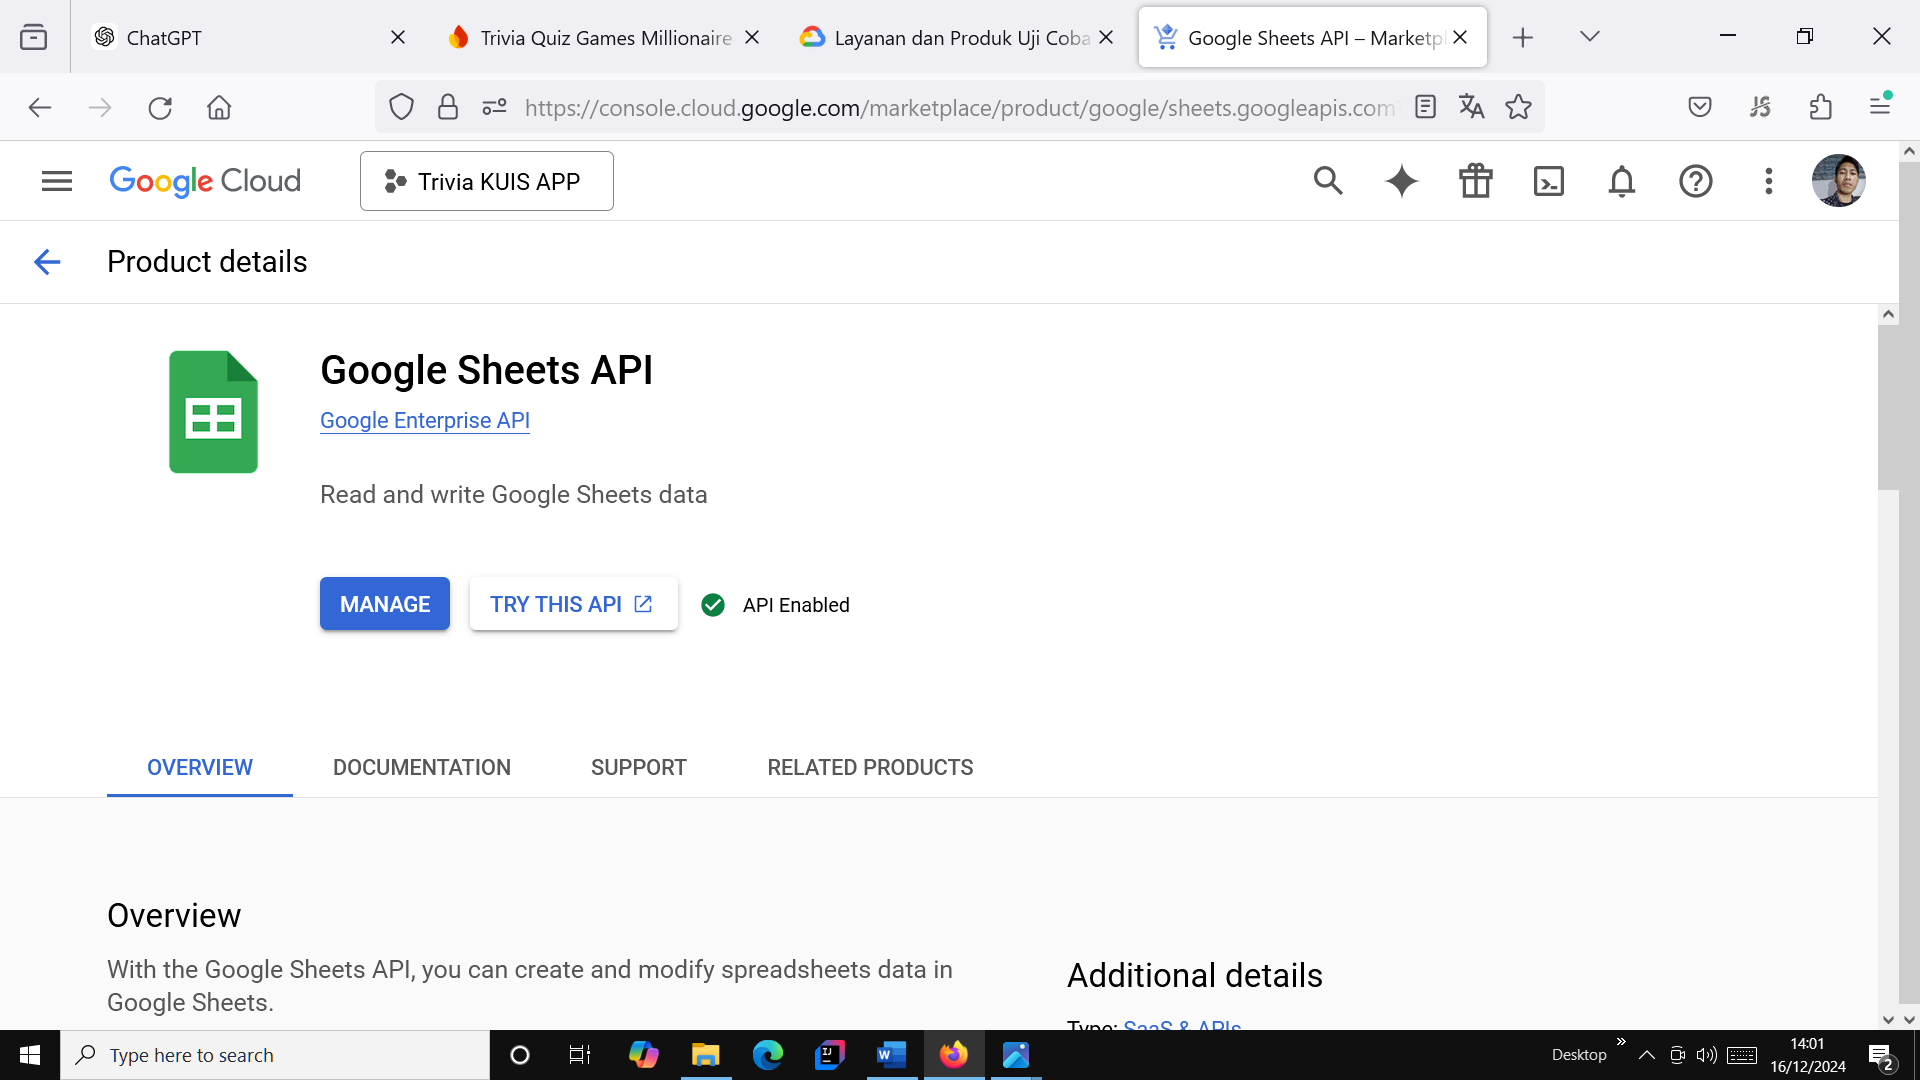
Guide 5: Enabling Google Sheets API from Google Cloud Console
In this step, you will enable the Google Sheets API to allow your app to interact with Google Sheets:
- Go to Google Cloud Console and create a new project or select an existing project.
- Enable the Google Sheets API and Google Apps Script for your app:
- Go to the Library in Google Cloud Console.
- In the search bar, type Google Sheets API, select the API, and click the Enable button to enable the API for your project.
- Obtain the API credentials and add them to your app to connect the app with Google Sheets:
- Go to the Credentials tab in Google Cloud Console.
- Click Create Credentials and select API Key.
- Copy the API Key that appears and store it securely.
- To use the API Key securely in your Android app:
- Open the
build.gradle(Module level) file in your project. - Replace
REPLACE_WITH_YOUR_API_KEYwith the API Key you copied from the Google Cloud Console. - Sync your project to apply the changes.
Next, for a more detailed guide on configuring the API Key and Base URL, please continue to Step 7: Adding API Key & Base URL.
Guide 6: Creating Questions with Categories in Spreadsheet
Follow the steps below to create questions and add categories in the spreadsheet. Ensure that the categories you define in the spreadsheet are consistent with the categories used in your Android app.
Important Note: Google Account Consistency
When creating and integrating the spreadsheet with your app, make sure to use the same Google account for Firebase, Google Cloud, and Google Sheets. Using different accounts may result in incorrect JSON responses and errors during integration.
-
Download the Spreadsheet Template:
Download the template from the link below: Download Spreadsheet Template - Open the Template File:
Open the template file using a spreadsheet application like Google Sheets. - Edit the Spreadsheet:
Edit the columns as needed:- Question: Add the question you want to display in the app.
- Options: Add answer options separated by commas.
- Answer Index: Enter the index of the correct answer (starting from 0).
- Category: Add a category for each question, such as "Science", "Mathematics", or others. Note: Ensure that the categories used here match those defined in the
strings.xmlfile in your Android project.
- Save the Spreadsheet File:
Save the spreadsheet file after editing. - Upload the Spreadsheet:
Upload the spreadsheet to Google Sheets or integrate it with your app using the Google Sheets API.
Important: Ensuring Category Consistency
To maintain consistency between your spreadsheet and your Android app, ensure that the categories in the spreadsheet exactly match those in your app’s strings.xml. Follow these steps:
- Check the Categories in
strings.xml:
Openres/values/strings.xmlin your Android project and ensure that the categories are defined as follows:<resources> <string name="category_general_knowledge">General Knowledge</string> <string name="category_history">History</string> <string name="category_technology">Technology</string> <string name="category_science">Science</string> <string name="category_art_culture">Art and Culture</string> <string name="category_geography">Geography</string> </resources> - Match Categories in the Spreadsheet:
Ensure that the Category column in the spreadsheet contains exactly the same values as those in thestrings.xmlfile (e.g.,General Knowledge,History,Science, etc.).- Example:
Question Options Answer Index Category What is the capital of France? Paris, Berlin, Madrid, Rome 0 Geography Which planet is known as the Red Planet? Venus, Mars, Jupiter, Saturn 1 Science - Verifying Data Consistency:
After editing both thestrings.xmland the spreadsheet, verify that no category name in the spreadsheet differs from the one instrings.xml. If the categories are inconsistent, the app will fail to display the correct category.
Adding New Categories
To add a new category:
- Update
strings.xml:
Add a new string entry inres/values/strings.xmlwith the desired category name, e.g.:<string name="category_new_category">New Category</string> - Update the Spreadsheet:
Add the new category name to the Category column in the spreadsheet, ensuring it matches the value defined instrings.xml. - Verify Consistency:
Double-check that the new category name in both the spreadsheet andstrings.xmlare identical.
Getting the Spreadsheet ID:
To integrate the spreadsheet with your app, you need the Spreadsheet ID. Here’s how you get it:
- Open the Spreadsheet:
Open your Google Sheets file in a browser. - Find the Spreadsheet ID:
The URL will look like this:
Copy the part of the URL after /d/ and before /edit. That is your SPREADSHEETS_ID.https://docs.google.com/spreadsheets/d/SPREADSHEETS_ID/edit#gid=0
By following these steps and ensuring the category names in the spreadsheet match the ones in your Android app’s strings.xml, you’ll maintain consistency across the app and spreadsheet, which is crucial for smooth app functionality.
If you encounter any issues, feel free to consult the documentation or reach out for further assistance.
Guide 7: Creating an API for the Trivia Quiz
In this step, we will use Google Apps Script to create a simple API that serves trivia quiz questions. Make sure to use the same Google account throughout this guide.
-
Open Google Apps Script:
Open Google Apps Script in your browser. Click New Project to create a new project.
-
Write the API Code:
Copy and paste the following code into the Apps Script editor:
 JavaScript
function doGet(e) { const sheet = SpreadsheetApp.openById("SPREADSHEETS_ID").getSheetByName("Sheet1"); const rows = sheet.getDataRange().getValues(); const json = rows.slice(1).map(row => ({ question: row[0], options: row[1].split(",").map(option => option.trim()), answerIndex: parseInt(row[2]), category: row[3] })); return ContentService.createTextOutput(JSON.stringify(json)) .setMimeType(ContentService.MimeType.JSON); } -
Deploy the Script as a Web App:
1. After writing the code, click Deploy > New Deployment at the top right of the Apps Script editor.
2. Choose Web app as the deployment type.
3. Fill in the deployment description, e.g., "API for Trivia Quiz".
4. Set the access permissions with the following settings:
- Execute as: Me
- Who has access: Anyone
5. Click Deploy and grant permissions if prompted.
-
Copy the Web App URL:
1. After deployment is complete, you will be given a Web App URL. Copy this URL to use as your API endpoint.
https://script.google.com/macros/s/AKfycbxyz12345/example-url/execThis is the URL that your Android Trivia Quiz app can use to fetch quiz question data.
-
Test the API Using a Browser:
To quickly test the API, paste the Web App URL into your browser's address bar and press Enter. If the script is working correctly, it will return a JSON response containing quiz question data.
-
Test the API Using Postman:
1. Open the Postman app or open its web version.
2. Click the New Request button and choose GET as the HTTP method.
3. Enter the Web App URL you copied earlier into the URL field in Postman.
4. Click the Send button to send a GET request to the API.
5. If your API is working correctly, you will receive a JSON formatted response containing quiz question data. Example response:
      [
        {
          "question": "What is the capital of France?",
          "options": ["Paris", "London", "Berlin", "Rome"],
          "answerIndex": 0,
          "category": "Geography"
        },
        {
          "question": "What is 2 + 2?",
          "options": ["3", "4", "5", "6"],
          "answerIndex": 1,
          "category": "Mathematics"
        }
      ]
Guide 8: Adding API Key & Base URL
To integrate the app with an external API, you need to add and configure the API Key in your project. Here are the steps:
-
Update the
build.gradle (Module: app)fileMake sure the
build.gradleconfiguration includesbuildConfigFieldto add BASE_URL and API_KEY. Add the following code: Gradle
android { buildFeatures { buildConfig = true // Enable buildConfig } buildConfigField("String", "BASE_URL", "\"https://script.google.com/macros/s/REPLACE_WITH_YOUR_URL/\"") buildConfigField("String", "API_KEY", "\"REPLACE_WITH_YOUR_API_KEY\"") } -
Replace
API KeyandBase URLMake the following replacements:
- REPLACE_WITH_YOUR_URL: Replace with the base URL from your Google Apps Script Web App without including
execsuffix. Example:
https://script.google.com/macros/s/AKfycbwRGNtk1bgIS9ho_6dJLewNHh4s7aulJfBZlBOtM9FBblcNHfnE8YyHMjRmV2gJ6nxL/ - REPLACE_WITH_YOUR_URL: Replace with the base URL from your Google Apps Script Web App without including
- REPLACE_WITH_YOUR_API_KEY: Replace with the API Key obtained from Google Cloud Console.
-
Referencing in Code
Use the
BuildConfigclass to access theBASE_URLandAPI_KEYvalues. Example: Kotlin
          val baseUrl = BuildConfig.BASE_URL
          val apiKey = BuildConfig.API_KEY
These values can now be securely accessed via
BuildConfigand used throughout your app.
- Ensure that the
google-services.jsonfile has been added correctly if using Firebase. - Verify that the
API KeyandBase URLare active and accessible. - Test the configuration thoroughly to ensure proper API integration.
Guide 9: Integrate AdMob
To integrate AdMob into your trivia quiz app, follow these steps:
Step 1: Update Application ID
Open the AndroidManifest.xml file in your project and update the Application ID:
<application>
  ...
  <meta-data
      android:name="com.google.android.gms.ads.APPLICATION_ID"
      android:value="YOUR_APPLICATION_ID" />
</application>
Note: Replace YOUR_APPLICATION_ID with the actual Application ID from your AdMob account. You can find this in the
AdMob Console.
Step 2: Update Ad Unit IDs
Open the res/values/strings.xml file and update the Ad Unit IDs for the banners, interstitial, and rewarded ads:
<resources>
  ...
  <string name="ad_unit_banner">YOUR_BANNER_UNIT_ID</string>
  <string name="ad_unit_interstitial">YOUR_INTERSTITIAL_UNIT_ID</string>
  <string name="ad_unit_rewarded">YOUR_REWARDED_UNIT_ID</string>
</resources>
Note: Replace the placeholder values (e.g., YOUR_BANNER_UNIT_ID) with the actual Ad Unit IDs from your AdMob account.
Step 3: Testing with Sample Ads
If you haven't set up your AdMob account yet, you can test the integration using AdMob's sample IDs:
- Banner Ad Unit ID:
ca-app-pub-3940256099942544/6300978111 - Interstitial Ad Unit ID:
ca-app-pub-3940256099942544/1033173712 - Rewarded Ad Unit ID:
ca-app-pub-3940256099942544/5224354917
Remember to replace these with your own Ad Unit IDs before publishing your app.
Guide 10: Update Privacy Policy and Terms of Service URLs
To update the URLs for Privacy Policy and Terms of Service, follow these steps:
- Open the
res/values/strings.xmlfile in your project. - Find the following lines:
https://your.privacy.policy.url https://your.terms.of.service.url - Replace the URLs with your own:
- Example Privacy Policy URL:
https://example.com/privacy - Example Terms of Service URL:
https://example.com/terms
- Example Privacy Policy URL:
- Save the file and test the app to ensure the links work correctly.
Guide 9: Reskin App
You can customize the app's design by changing the following visual elements:
- Replace the app logo and icon in the
res/drawablefile. - Update the theme colors in the
res/values/colors.xmlfile. - Replace the splash screen by adding an image in the
res/drawablefolder and updating the configuration in theAndroidManifest.xmlfile. - Customize the text and other UI elements to match your app's identity.